讀卡機讀不到怎麼辦?

摘要
很多用戶在升級了Windows 10 後會出現SD卡讀卡機無法正常顯示,SD卡裡的檔案無法讀取的問題。其實這是Windows 中比較常見的問題,也比較容易修復。下面將列出解決SD卡讀卡機讀不到的幾種解決方法。
目录
方法一、檢查Windows 10上與SD卡讀卡機相關的硬體設備
• 您可以使用橡皮擦擦除記憶體卡(SD卡、microSD卡等)上金手指的氧化層並將其重新連接到Windows。
• 也可以嘗試使用電腦的其他USB插槽查看是否可以正常讀取SD卡。
簡單的方法是換一個SD卡插在讀卡機上看一看是否正常,如果正常,則說明是讀卡機的原因。
關於耗損平均技術
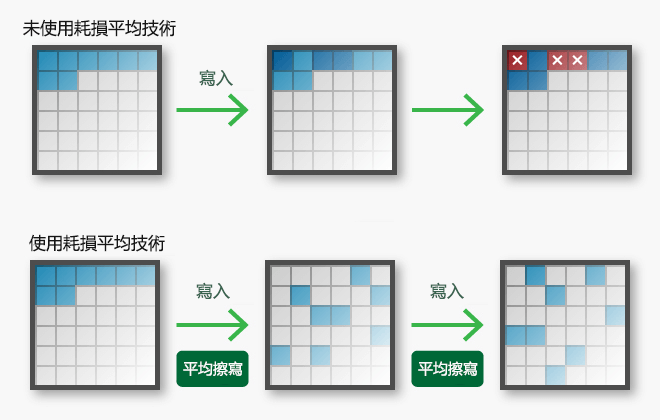
NAND快閃記憶體因製造技術的差異,有著不同的抹寫次數限制。對單一區塊(Block)不斷重複地寫入和抹除,區塊會因過度使用造成讀寫速度變慢,嚴重者甚至會損壞而產生損壞。耗損平均技術(Wear Leveling)能使儲存裝置中的每個NAND快閃記憶體的區塊平均地被使用,避免資料只在特定區塊做寫入及抹除動作,導致整個裝置因損壞過多而無法使用。
耗損平均技術通過將寫入分配到快閃記憶體介質上的多個區塊,可平均控制每一區塊的抹寫次數,以避免特定區塊的過度使用;原則上,耗損平均技術能使快閃記憶體介質上的所有區塊幾乎同時達到其耐久限制,從而延長快閃記憶體介質的使用壽命。耗損平均技術的作用,是保證快閃記憶體顆粒中的每一個區塊能平均地被使用,避免單一區塊耗損次數過多,導致區塊損壞或資料丟失。而該技術可細分為三種模式:
- 動態磨損均衡(Dynamic Wear Leveling): 只使用可用空間做磨損均衡,確保資料只會寫入在同一空間內抹除次數較低的區塊。
- 高級磨損均衡(Static Wear Leveling): 使用單一快閃記憶體顆粒內的所有空間做均勻應用,會將資料從讀寫耗損次數較少的區塊移至其他區塊;寫入次數較低的區塊就可以被空出來使用。
- 全區磨損均衡(Global Wear Leveling): 磨損均衡範圍擴及整個儲存裝置中的快閃記憶體顆粒,資料會平均地寫入到整個儲存裝置內讀寫耗損次數較低的區塊。
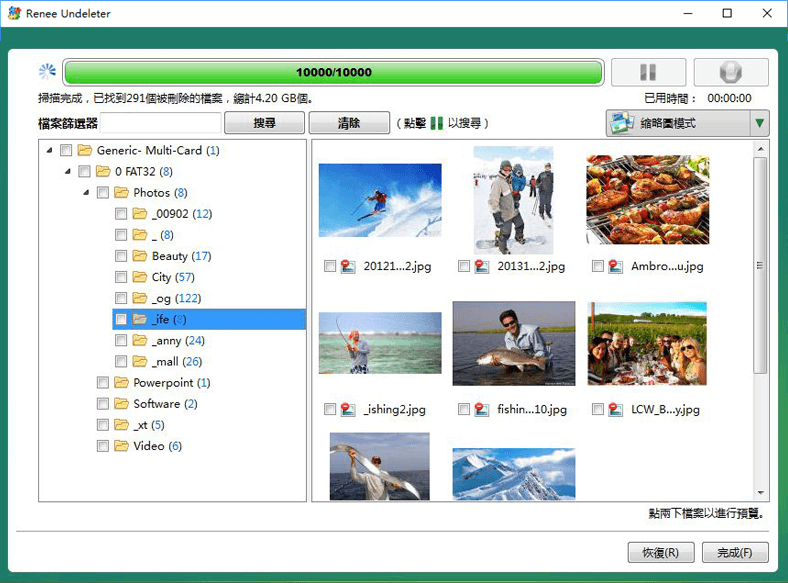
因此,沒有耗損平均技術的SD卡,內部快閃記憶體非常容易在區塊的頭部位置出現單點存儲顆粒損壞的情況,從而導致檔案系統損壞且無法讀寫,SD卡內部存儲的資料也會因此而丟失。當出現因SD卡損壞而導致的資料丟失情況時,建議使用Renee Undeleter找回SD卡中的資料,軟體可以繞過SD卡中損壞的區塊,重建SD卡檔案系統,最大限度找回SD卡中仍然完好的檔案資訊。

使用「Shift + Del」鍵永久刪除、清空的資源回收筒內的檔案資訊可通過Renee Undeleter找回。
隨身碟被要求格式化,可在進行格式化前使用Renee Undeleter進行掃描救援!
界面簡潔明了,非技術人員也可輕鬆使用軟體。
內建三種不同的掃描方案,可針對不同的檔案丟失原因進行掃描救援!
支援邊掃描邊預覽已掃描到的檔案資訊,確認檔案內容及質量後,可立即停止掃描進行救援!
適用於:Windows 10 / 8.1 / 8 / 7 / Vista / XP (32bit/64bit) & Mac OS 10.6 或以上
使用「Shift + Del」鍵永久刪除、清空的資源回收筒內的檔案資訊可通過Renee Undeleter找回。
隨身碟被要求格式化,可在進行格式化前使用Renee Undeleter進行掃描救援!
內建三種不同的掃描方案,可針對不同的檔案丟失原因進行掃描救援!
可以不插SD卡把讀卡機插入電腦看下是否有提示有外接設備插入,如果有那麼讀卡機是有用的,如果沒有,則是讀卡機出現故障了。
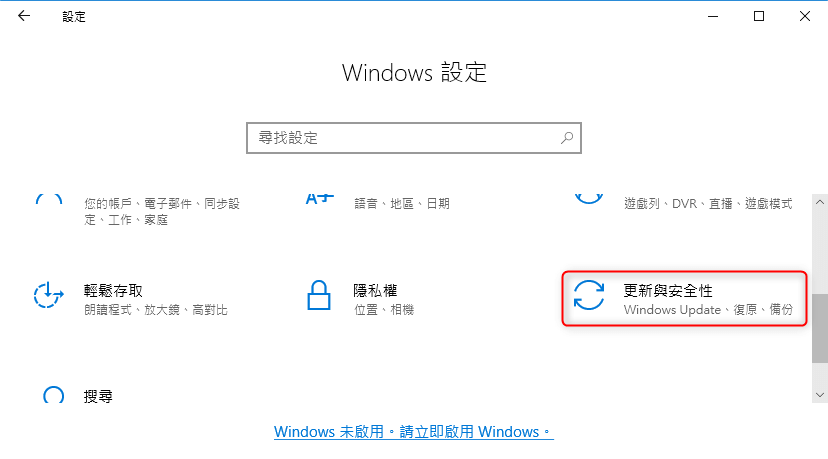
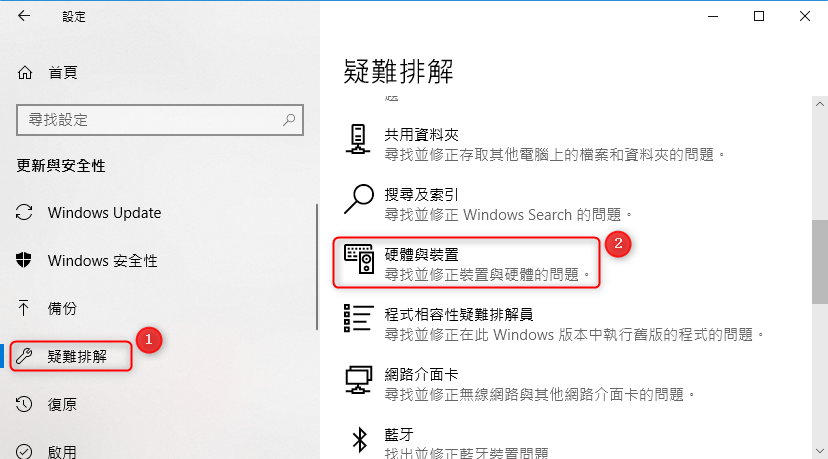
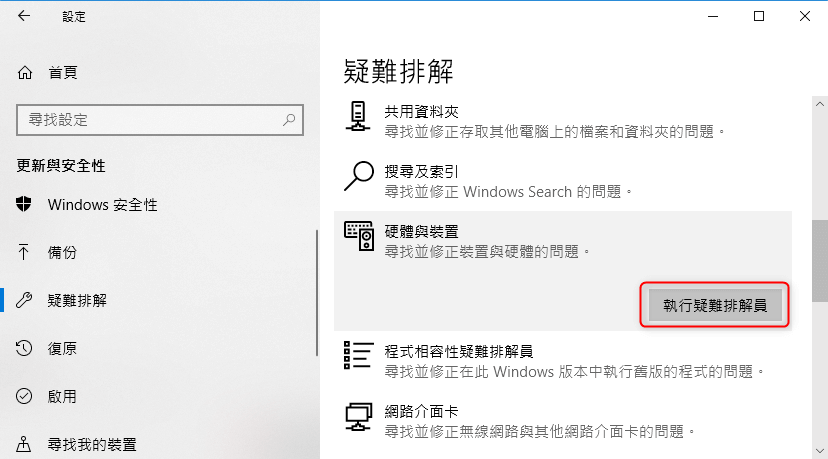
方法二、使用Windows 10故障排除修復SD卡讀卡機不工作問題
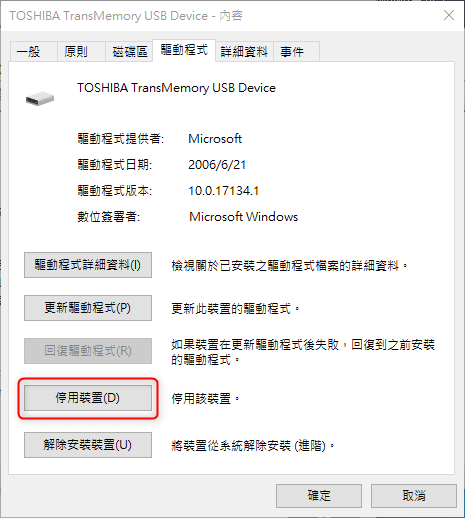
方法三、更新SD卡讀卡機驅動程式軟體或USB驅動程式軟體
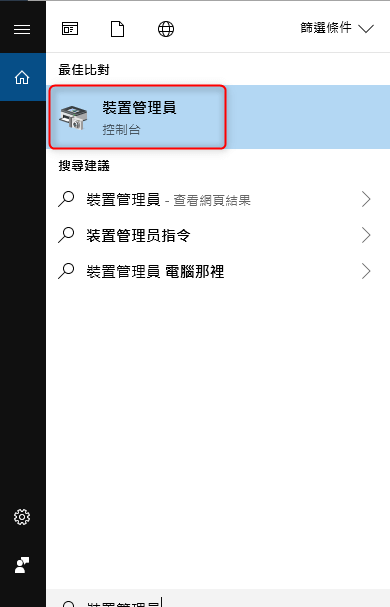
如果設備上沒有驚嘆號則表示正常運作(本圖為正常運作),但您的讀卡機已經和電腦USB連接,卻出現驚嘆號,表示電腦沒有順利讀取。
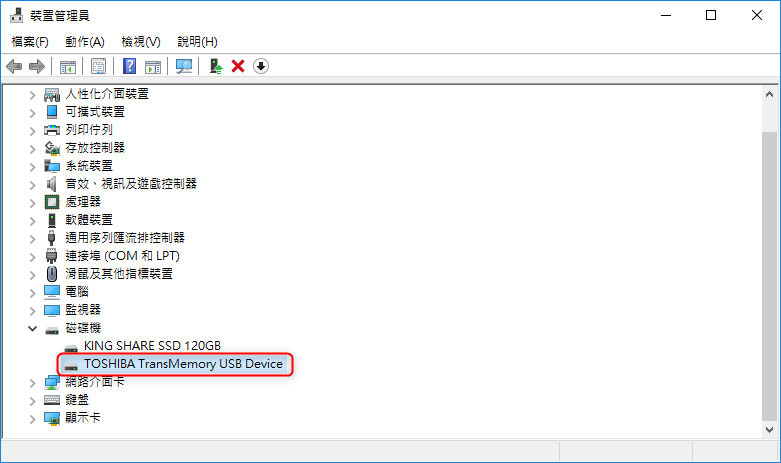
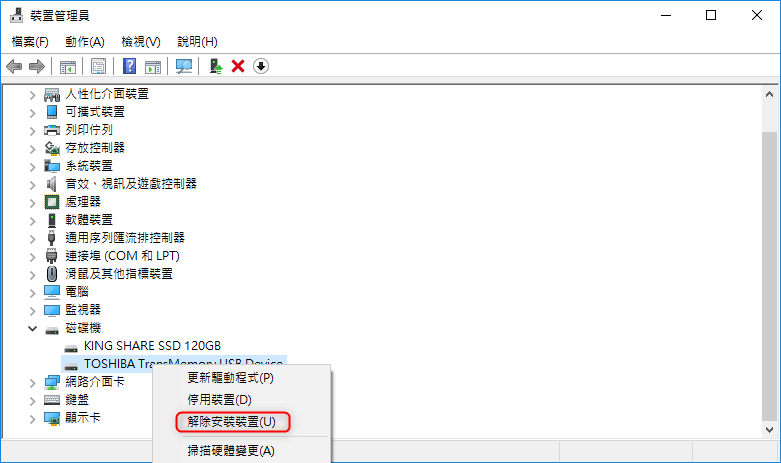
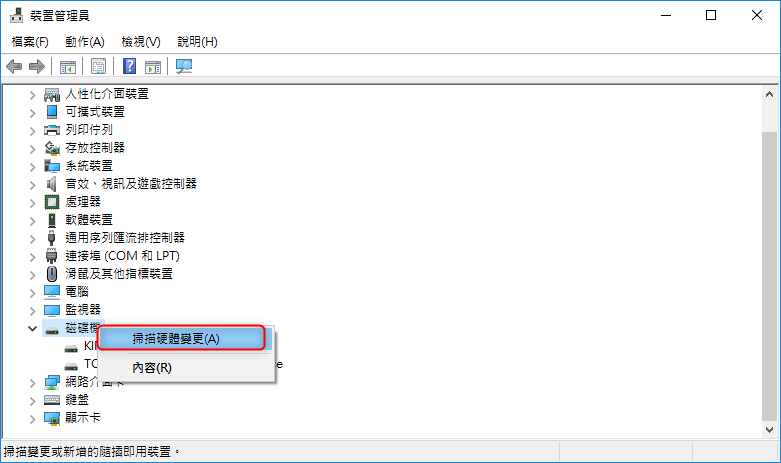
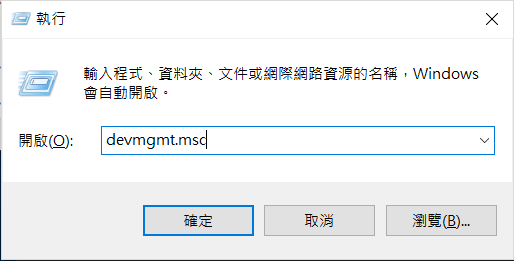
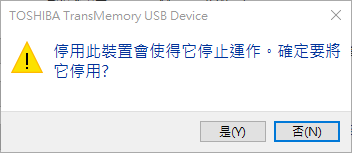
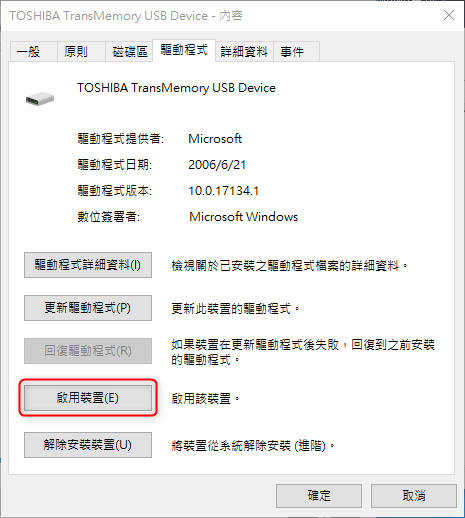
方法四、讓Windows10重新載入讀卡機的驅動程式軟體
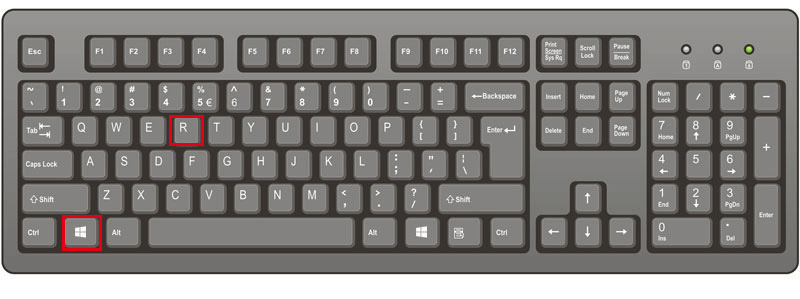
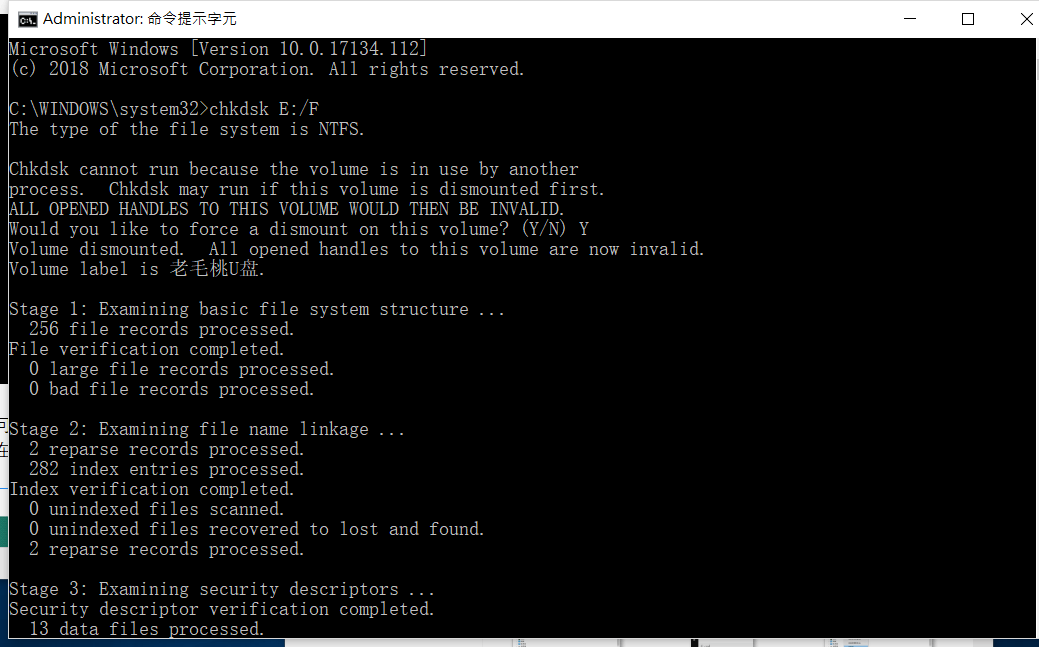
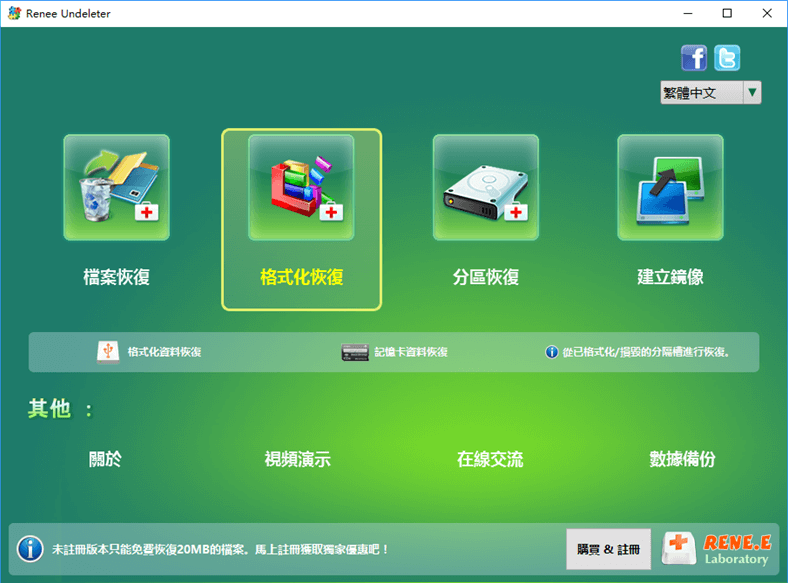
方法五、救援丟失的檔案並格式化SD卡以便重複使用


![右鍵點選[命令提示字元]並選擇[以系統管理員身分執行]](https://net.reneelab.com/wp-content/uploads/sites/7/2018/07/run-cmd-e1531215321693.png)